How To Tighten Belt On Genie Garage Door Opener

Top 10 Best Genie Garage Door Openers In 2020 Reviews Garage Door Opener Installation Best Garage Doors Garage Door Opener

Genie Garage Door Opener Model 450 Horsepower Smart Garage Door Opener Garage Door Opener Garage Doors

Genie Stealthdrive 750 1 1 4 Hp Belt Drive Garage Door Opener With Battery Backup And Added Wireless K In 2020 Smart Garage Door Opener Garage Doors Garage Door Opener

Top 10 Best Genie Garage Door Openers In 2020 Reviews Smart Garage Door Opener Garage Door Opener Remote Garage Door Opener

Genie Garage Door Opener Models 2022 2024 2027 2042 Repair Parts The Genie Company
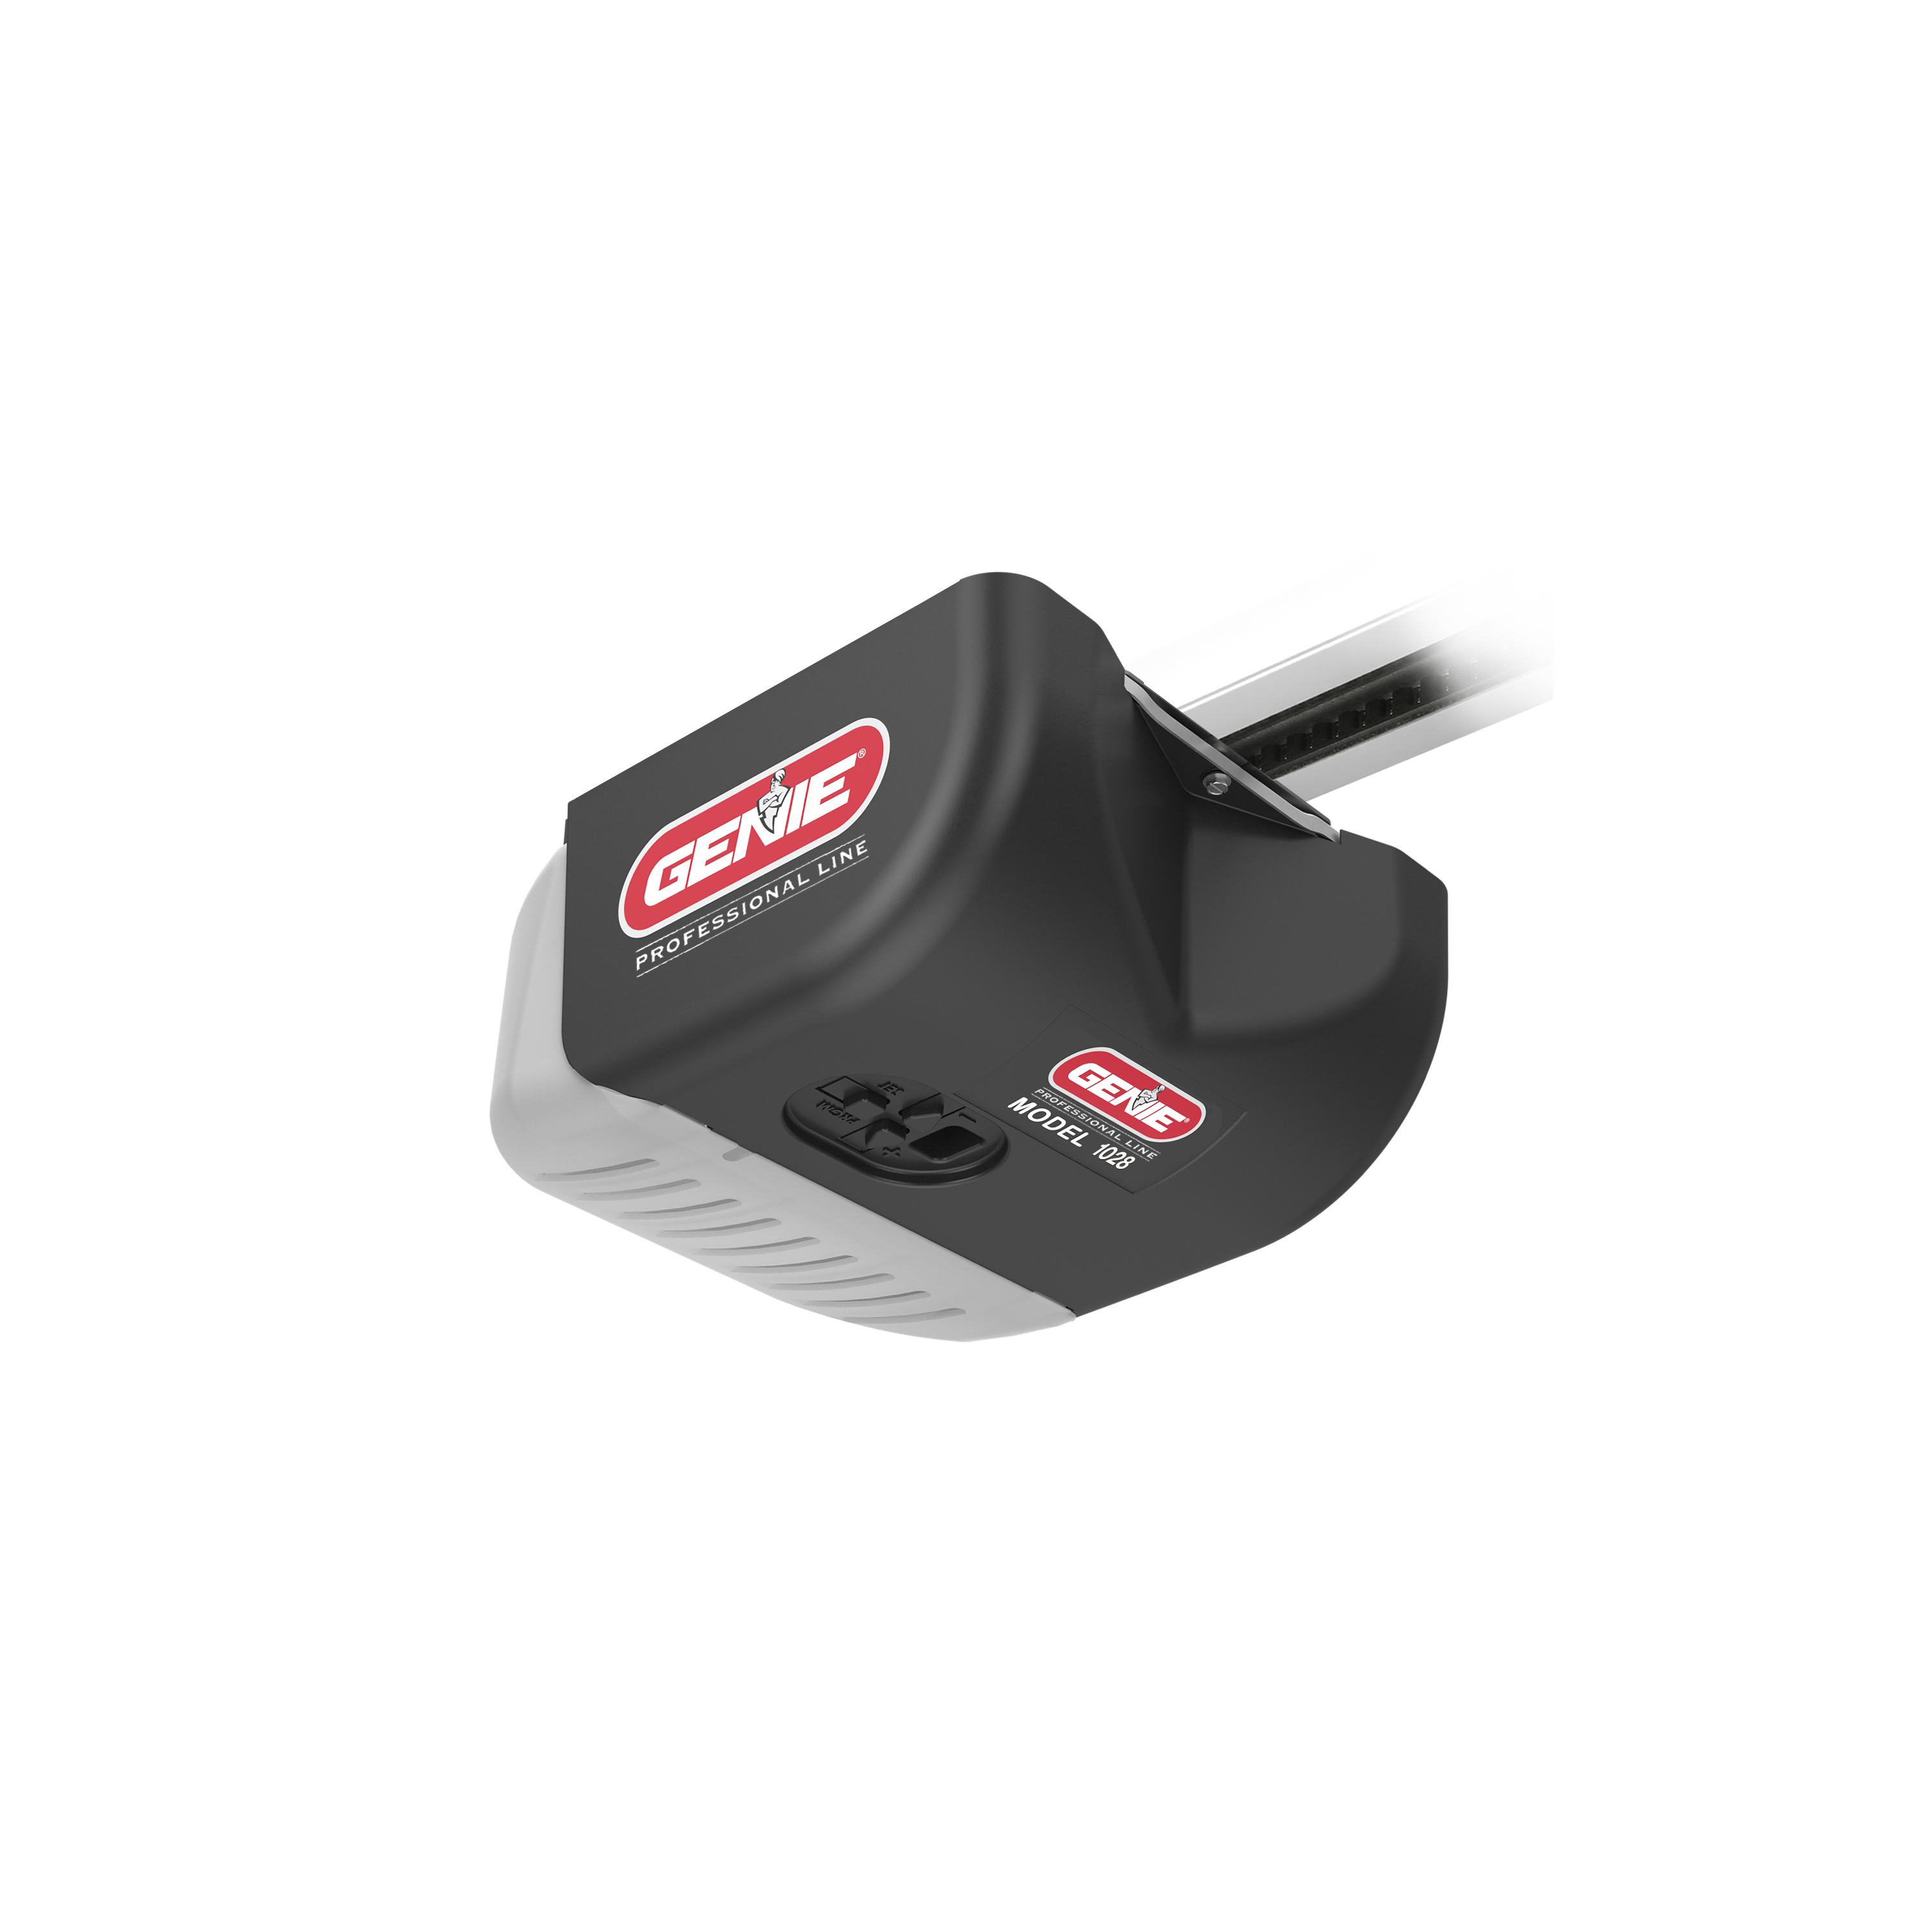
Model 1028 Garage Door Opener By Genie

Genie excelerator series garage door opener self diagnostic troubleshooting.
How to tighten belt on genie garage door opener.

Genie Garage Door Opener Belt Drive Model 7055 One Clear Choice Garage Doors Atlanta

6 Best Garage Door Opener Consumer Reports Genie Chainmax 1000 Garage Door Opener 3 4 Hpc Dc Ch Best Garage Doors Garage Door Opener Best Garage Door Opener

Genie Garage Door Opener 1028 Reliag 650 Proseries Hpc Dc Motor System Includes Wall Button Safe T Beams And One Button Remote Head 7 Belt Rail Amazon Com

Garage Door Openers Liftmaster Belt Vs Chain Garage Door Blog In Long Island Ny Liftmaster Garage Door Liftmaster Garage Door Opener Garage Door Opener

If You Are Looking To Replace An Existing Garage Door Opener With Something That Is Lightwe Garage Door Opener Sectional Garage Doors Garage Door Opener Remote

Genie Garage Door Opener Belt Chain Replacement Carriage Assembly The Genie Company

Genie Silentmax Connect 3 4 Hpc Ultra Quiet Belt Drive Smart Garage Door Opener With Aladdin Alexa Google Assistant Ready 3053 Tsv The Home Depot Smart Garage Door Opener Garage Door Opener

Belt Chain Drive Install Garage Door Opener Genie Garage Door Garage Doors

Genie Garage Door Sensor Blinking Red Light For Residence Garage Door Opener Installation Garage Door Opener Remote Garage Door Opener Troubleshooting

Genie Blue Max Garage Door Sensors Garage Door Remote Garage Door Opener Remote Garage Door Installation

Garage Door Nation Is Your 1 Source On The Internet For Garage Door Torsion Springs And Other Parts We Of With Images Garage Doors Garage Door Opener Garage Door Springs

Genie Blue Max Garage Door Opener Learn Button Garage Door Opener Garage Doors Door Opener
I Just Ordered One Of These Genie 3 4 Hp Intellicode 2 Belt Garage Door Opener Garage Door Remote Garage Door Opener Electric Garage Doors

Genie Garage Door Opener Belt Garage Door Opener Review With Images Genie Garage Door Garage Door Installation Garage Door Opener

How To Install Craftsman Belt Drive 3 4 Hp 54918 With 8 Extension 53728 With Images Garage Door Remote Craftsman Garage Door Craftsman Garage Door Opener

Genie Silentmax Led Connect Ultra Quiet Belt Drive Smart Garage Door Opener W Led Lighting And Battery Backup Aladdin 7155l Tksv The Home Depot In 2020 Garage Doors Garage Door Spring Replacement

If You Are Looking To Replace An Existing Garage Door Opener With Something That Is Lightweight Quiet And Works Smoothly Genie Garage Door Opener Genie Garage Door Garage Doors Garage
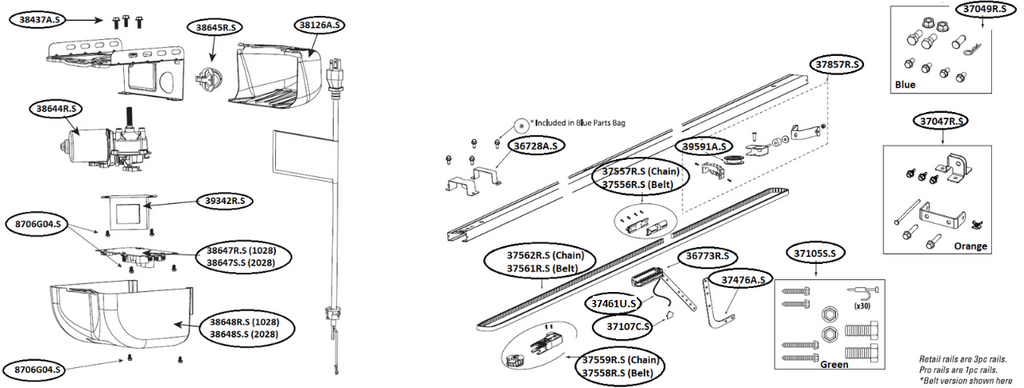
Genie Garage Door Opener Replacement Parts For Reliag Models 1028 2028 Tagged Belt Assembly The Genie Company
1

Genie Replacement Belt For 7 Garage Door Opener 39354r S The Genie Company

Genie 36454c S Reliag 600 Garage Door Opener Power Head Cover Blue By Genie 20 76 Cover Pwrhd Genie Blue Home Hardware Garage House Home Hardwar

Belt Drive Sprocket 37558r S For Genie Garage Door Openers The Genie Company

Chamberlain Ultra Quiet Strong 1 2 Hp Belt Drive Garage Door Opener Www Chamberlain Com Best Garage Door Opener Chamberlain Garage Door Opener Garage Door Opener

Replacing Old Genie Garage Door Opener Parts The Genie Company

Genie Replacement Belt For 8 Garage Door Opener 37561s S The Genie Company

Basics And Replacement Genie Garage Door Carriages A Click Away Blog

Genie Replacement Belt For 8 Garage Door Opener 39354s S The Genie Company

Genie Garage Door 36607a Belt And Connector 7 Foot Genie Garage Door Openers 36607a Belt And Connector 7 Foot One Left In 2020 Garage Doors Garage Door Opener Garage

Belt Drive Sprocket 39278r S For Genie Garage Door Openers The Genie Company

Genie 4042 Tkc Silentmax 1200 3 4 Hpc Dc Belt Garage Door Opener With 2 3 Button Remote Wall Console Wireless Keypad Motion Detector And Safe T Bea Best Garage Door Opener Best Garage Doors Garage

Mighty Mule 1 1 4 Hp Smartphone Controlled Garage Door Opener With Built In Led Lighting And Ultra Quiet Belt Drive Mm9545m Garage Door Opener Smart Garage Door Opener Garage Door Installation
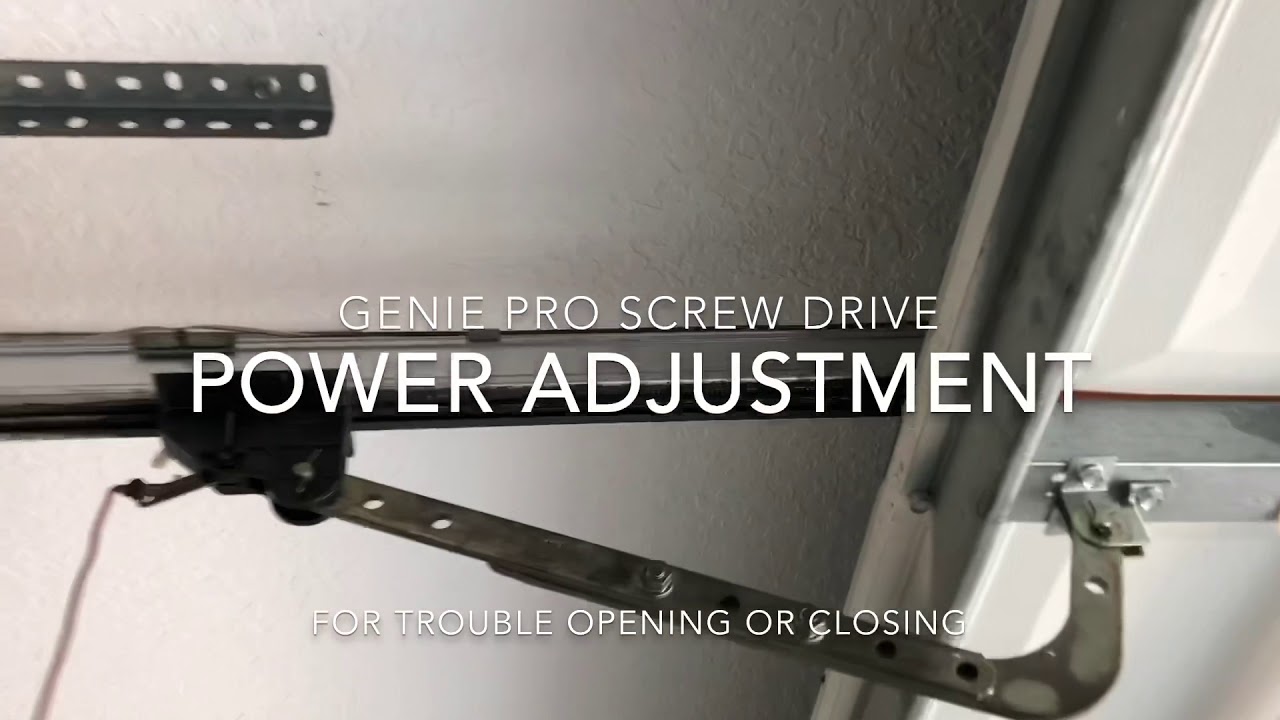
Genie Garage Door Opening Or Closing Problem Fix Youtube

Best Garage Door Openers Of 2017 Best Garage Doors Garage Door Repair Garage Door Opener

Genie Garage Door Opener Models 3022 3024 3042 Replacement Parts The Genie Company

Awesome Sears Garage Door Opener Battery Size With Regard To Fantasy Craftsman Garage Door Opener Quiet Garage Door Opener Craftsman Garage Door

Garage Door Parts Lowes Shop Genie Garage Door Belt Deurgreep The Doors Deurscharnieren

Genie Silentmax 750 3 4 Hpc Ultra Quiet Belt Drive Garage Door Opener With Wireless Keypad 3055 Tksv The Home Depot Garage Door Opener Replacement Garage Doors Craftsman Garage Door Opener

Chamberlain Group B550 Smartphone Controlled Ultra Quie Smart Garage Door Opener Garage Door Opener Chamberlain Garage Door Opener

Gk R Keyless Entry Gm3t R Remote Universal Push Button Pack Garage Door Keypad Remote Bright Led Flashlight

G1t Bx 1 Button Remote 2 Pack Visor Clips Garage Door Accessories Garage Door Opener Remote

Chamberlain 1 2 Hp Heavy Duty Chain Drive Garage Door Opener C205 With Images Garage Door Opener Genie Garage Door Garage Doors

Genie Belt Drive Bullet Assembly 37556r S The Genie Company

198 00 Genie Silentmax 1000 3 4 Hp Comparable Belt Drive Garage Door Opener With Closed Confirm Remote 3042 Kccv The Home De Diy Home Improvement Garag
Https Encrypted Tbn0 Gstatic Com Images Q Tbn 3aand9gcqo8gmaqwqtw9kbfjj86m04jqjg5wy8gw Gudamew2ipiva8s1a Usqp Cau
Source : pinterest.com
