How To Start Tiling Shower Wall

12x24 Wall Tile Grid Pattern In Walk In Shower Niche Large Shower Tile Tile Walk In Shower Large Tile Bathroom

How To Tile A Bathroom Shower Walls Floor Materials 100 Pics Pro Tips Shower Wall Bathroom Shower Walls Shower Tile

How Does This Shelf Do For Water Retention And Mold Risk Linear Light Gray Shower Wall Tile With Hexagon Mosaic She In 2020 Shower Wall Tile Tile Bathroom Shower Tile

2018 Img Q2 Hi Res Rights Fio Creative Photo Cara Alyn Interiors Web Hi Resolution Bathroom Shower S Bathroom Shower Walls Bathroom Wall Tile Bathrooms Remodel

Tiling Inside Corners Ceramic Tile Advice Forums John Bridge Ceramic Tile 1 16th Gap Shower Wall Shower Tile Bathroom Shower Walls

Complete Re Do Of My 80 Main Bath Let The Demo Begin White Bathroom Tiles Bathroom Wall Tile Bathrooms Remodel

Mortar is essential for a firm and solid foundation for your shower tile.
How to start tiling shower wall.

15 Bathrooms That Have Been Transformed With Wood Tile Wood Tile Shower Farmhouse Shower Bathroom Shower Tile

Small 36x36 Shower Decided To Use 12x24 Tile Small Tile Shower Tile Bathroom Shower Tile

Plumbing Parts Plus Subway Tile Showers Shower Wall Tile Shower Wall Panels

Everything From Lowe S Shower Walls 6x24 Leonia Silver Porcelain Floor Delfino Arctic Topaz Pebble Bathroom Shower Tile Shower Remodel Bathrooms Remodel

Master Bathroom Complete Remodel 12 X 24 Vertical Tile Contemporary Bathroom Austin By Cust Bathroom Remodel Shower Shower Wall Tile Shower Remodel

Things That Sparkle Renovation Updates Shower Tile Master Bath Shower Tile Bathroom

Shower Subway Tiles These Are The 4x8 American Olean Tiles From Lowes They Are Called Starting Line Subway Tile Showers Olean Tile Tub Surround

Beautiful Gray Tile Shower With Thin Accent Strip Gray Shower Tile Bathroom Remodel Master Bathrooms Remodel

Shower Ideas Large Custom Tile Shower With Large Tile Walls With Small Glass Tiel Accent Built In Cubbie And Corner Shower Tile Shower Remodel Corner Shower

Spruce Up Your Shower By Adding Pebble Tile Accents Click The Pin To Get Started On Your Next Bathroom Remodelin Tile Remodel Shower Remodel Bathrooms Remodel

Bathroom Shower Wall Tile Classico Beige Porcelain Wall Tile Bathroom Shower Walls Bathroom Shower Tile Small Bathroom Tiles

Hex Hexagon Tile Vertical Listello In Seated Shower Bathrooms Remodel Small Bathroom With Shower Bathroom Shower Tile

Gray Tiled Shower With Square Tile Shower Floor And White Accent Tile Niche Gray Shower Tile Shower Tile Bathroom Shower Walls

Page Not Found Castle Building Remodeling Inc Shower Tile Shower Wall Gray Shower Tile

Pin By Amy Authement On Ross Project Tile Bathroom Amazing Bathrooms Restroom Remodel

Gray Tiled Shower With Accent Chevron White Tile Shower Tile White Tile Shower Tile Accent Wall

Ivory Tile Shower Glass Grey And Brown Tile Accent With Glass Shower Door Brown Tile Shower Shower Tile Shower Accent Tile

Tiled Shower Walls Angora Soho White 4x16 Shower Accent Mirror Glass Silver Silvergrout Mapei White Tile Shower Bathroom Shower Tile Shower Accent Tile
1

Tile Design Set In In The Main Shower Wall And A Custom Shower Shower Wall Tile Shower Tile Shower Tile Designs

Bathroom Shower Wall Tile New Haven Glass Subway Tile Bathroom Shower Walls Small Bathroom Tiles Bathroom Wall Tile Design

Skybridge Gray 12x24 Wall Tile Installed Vertical Stacked In Master Garden Shower Shower Wall Tile Vertical Shower Tile Gray Shower Tile

Coastal Spa Shower Wood Tile Shower Shower Wall Tile Pebble Shower Floor

Custom Tiled Shower In 12x24 Porcelain Tile Installed At A 1 3 Staggered Vertically With A Glass And Stone Glas Custom Tile Shower Shower Tile Shower Wall Tile

Small Bathroom Like Tiles On Shower Floor And Walls Of Shower And Floor Che Bathrooms Remodel Small Bathroom Small Bathroom Remodel

Master Bath With Mosaic Tile Flooring In 2020 Tub Surround Tile Tub Surround Bathroom Renovation

White Large Format Field Tile From Art Tile In Oakland To Be Used For Shower Walls In Same Verti White Bathroom Tiles Large Tile Bathroom Vertical Shower Tile
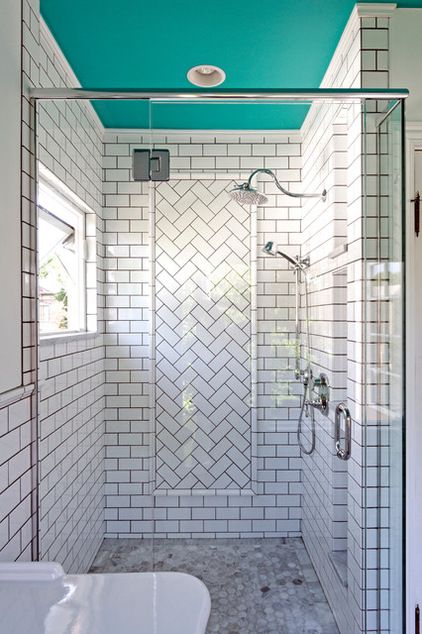
Room Of The Day A Splash Of Turquoise In A Vintage Inspired Bath Bathrooms Remodel Bathroom Design Painted Ceiling

Marble Tiled Bathroom Flooring And Walls With Brown Tiled Accents In 2020 Tile Bathroom Brown Tile Bathroom Bathroom Floor Tiles

Guest Bathroom With Grey Subway Tile Shower Walls And Basket Weave Tile Floor Bathroom Floor Tiles Mosaic Tile Bathroom Floor Mosaic Bathroom

Home By Heidi Diy Cost Efficient Bathroom Bathrooms Remodel Shower Inserts Shower Surround

Capozza Photo Gallery Shower Wall Tile Shower Tile Room Wall Tiles

White Tiled Shower With Accent Floor And Accent Square Glass Shower Door And Surround Classic Bathroom Design Bathroom Remodel Master Bathrooms Remodel

Riad Tile Casablanca Carrara Marble Diamond Bathroom Decor Colors Marble Bathroom Bathroom Decor

Simple Walls And Floor With Fancy Shower Floor It S A Small Area And You Can Take Some Chances Bathroom Shower Walls Farmhouse Shower Shower Wall Tile
Pin On Avalon Tile Collection

Beige Tiled Shower With Accent Tile Strip In 2020 Shower Remodel Shower Reno Shower Tile

Grey Standing Mosaic Tile Master Bathroom Shower Bathroom Shower Pebble Tile

Corian Shower Wall Panels With Tile Look Farmhouse Master Bathroom Bathroom Remodel Master Bathrooms Remodel

The Top 10 Do S And Don Ts Of A Shower Remodel So You Won T Pull Your Hair Out Shower Remodel Shower Tile Shower Kits

5 Tips For Choosing Bathroom Tile Tile Bathroom Bathroom Tile Designs Shower Floor Tile

How To Compare Ceramic Tile Surrounds Vs Laminate Shower Wall Panels Shower Wall Panels Bathtub Shower Remodel Tub To Shower Remodel

Bathroom Shower Wall Tile Bosco Cenere Faux Wood Wall And Floor Tile Wood Tile Shower Bathroom Wall Panels Bathroom Shower Walls
Https Encrypted Tbn0 Gstatic Com Images Q Tbn 3aand9gcqznum 38ymy3df4j0dofupt5t2rvw267femi1nzylekfjfajqr Usqp Cau
Source : pinterest.com
