How To Nail Down Rolled Roofing

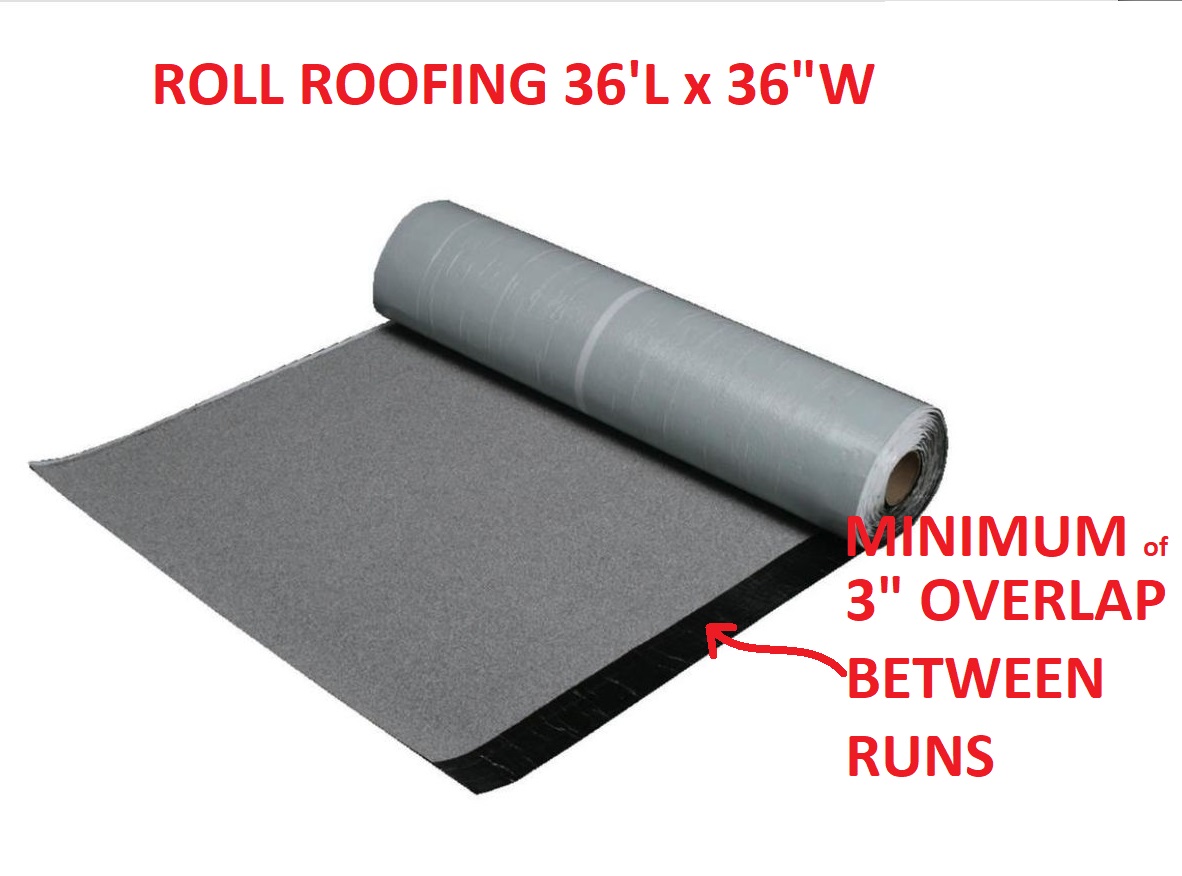
How To Install Roll Roofing With Your Own Hands Roll Roofing Flat Roof Fibreglass Roof

How To Install Roll Roofing With Your Own Hands Roll Roofing Flat Roof Repair Roofing
Asphalt Sbs Roll Roofing Installation Details How To Install Roll Roofing

How To Install Roll Roofing Do It Yourself Pj Fitzpatrick

Check Out How To Fix Roll Roofing Problems In Easy Way Roofingproblem Fixingroofdamages Almeidaroofing Roof Problems Roll Roofing Roofing

How To Shingle A Shed With 3 Tab And Architectural Shingles Shed Roof Replace Roof Shingles Installing Roof Shingles

Valleys will be open so flash them before hand with metal or two layers of roll roofing the first an 18 inch wide strip and the second 36 inches wide.
How to nail down rolled roofing.

How To Install Roll Roofing Lovetoknow

How To Install Asphalt Shingles Nailing On Ridge Cap Building A Shed Shed Installing Roof Shingles

How To Install Rolled Roofing On My Garden Shed Build Youtube

Install Roll Roofing With No Nails Doityourself Com
How To Properly Install Roll Roofing Doityourself Com

Gcp Applied Technologies Tri Flex Xt 48 In X 250 Ft Black Synthetic Roll Roofing Underlayment 5008087 1000 Sq Ft Roof Covering Metal Roof Panels

Pin Na Doske Krysha

General Roofing Grs On Twitter Roof Maintenance Roofing Maintenance Checklist

Diy Portico Part 2 Finishing The Ceiling The Roof Addicted 2 Decorating Diy Roofing Portico Roof Decoration

Gaf Quickstart 33 Lin Ft Peel And Stick Roofing Starter Shingle Roll 1122000fr The Home Depot Architectural Shingles Architectural Shingles Roof Shingling

Gcp Applied Technologies Grace Ice And Water Shield 36 In X 75 Ft Roll Self Adhered Roofing Underlayment 225 Sq Ft 5003002 The Home Depot Roll Roofing Underlayment Roofing

Simple Yet Beautiful Chimney Cap In 2020 Chimney Cap Roof Leak Repair Epdm Roofing
Roll Roofing How To Proper Install Roof Membranes Learn How The Roofing System Works Watch Youtube

Gaf Liberty Roll Roofing Membrane

13 Steps To Apply Rolled Roofing Infographic Rolled Roofing Roll Roofing Roofing Roof Repair Diy

Asbestos Application Methods Roofing Historic Preservation Historic Properties

Roofing Detail Draining Perimeter Edge 2018 03 01 Building Enclosure In 2020 Membrane Roof Roofing Drip Edge

The Term Pitch And Slope Are Often Used Interchangeably Which Is Incorrect They Do Not Mean The Same Thing And S Pitched Roof Calculate Roof Pitch Roof
Https Encrypted Tbn0 Gstatic Com Images Q Tbn 3aand9gcqjkko8nkm53uda0tqsqokgeiud1jh De9ily1gzmetu66zan7e Usqp Cau

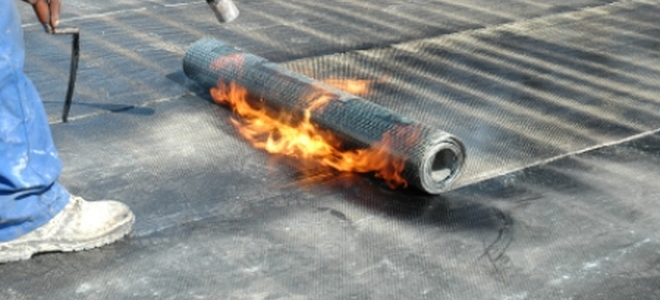
Torch Down Roofing My Way Youtube

Watch This Before Sheeting Your Roof With Osb Avoid This Costly Nail Roof Edge Roof Roofing

Roof Construction Basics Hometips Roof Construction Roof Repair Roofing

Atlas Shingles Featuring Scotchgard Protection By 3m Gave This Worn Down Roof A New Look Shingling Roof Shingles Outdoor Decor

How To Roof A House In 2020 Diy Storage Shed Plans Concrete Block Walls Roof
Roofing Felt Roofing Felt Cool Roof Roof Shingles

Pin On Exteriors
Http Www Quacent Com Q Images Stories Media Doc Installing 20roll 20roofing Pdf

You Ve Got A Real Type Of Thing Going Down Gettin Down There S A Whole Lot Of Rhythm Going Round 1 25 Inch Size Approx Roof Maintenance Roofing Roof

Black Nails Red Nails Matt Nails Chic Nails Rock Roll Red Nails Chic Nails Matte Nails

Pin On Diy

Metal Roofing Installation Begins With Using The Right Equipment Starting With Screws To Anchor Your Pan Metal Roof Installation Roofing Diy Roof Installation

Slate Timberline Hd Shingling Timberline Slate Roof Shingles
Various Types Of Rolled Roofing For Easy Cost Effective Roofing

How To Glue Down Edge Roll Roofing Home Guides Sf Gate

Hitachi 13365h Hitachi 13365h 2 In X 092 Rg Hdg Frh Siding Nail 3 6m Read More At The Image Link Head Ring Roofing Nails Hitachi

What Is Standing Seam Metal Roofing Comparisons Types Uses Metal Roof Standing Seam Roofing

Pin On The Shopchimney Blog

Looking For A 52 Quot X60 39 Tiki Thatch Roll For Tiki Bar Roofs Tiki Bar Tiki Hut Thatched Roof

How To Finish The Top Edge Of A Shed Roof In 2020 Shed Roof Installing Roof Shingles Shed Design Plans

How To Stick Edges Of A Low Slope Roll Roof Down On Fascia Doityourself Com Community Forums

Ridge Capping Installation Enhance Your Roof Quality Productivity Roof Repair Roof Installation Roof

Description On Itshere Is A Unique Picture Of Green Granulated Cap Being Torched Down Xl Roofing Is Very Flexibl Roofing Roofing Contractors Roofing Companies

Services We Offer 80011 Roofer 80011 Roofing 80011 Roof Repair 80011 Roof Installers 80011 Roof Installation 800 Roof Leak Repair Reroofing Roof Installation
Https Encrypted Tbn0 Gstatic Com Images Q Tbn 3aand9gcsmiidxu Hmbfvd4jm4 Uqx Kw5j3xn8hitrbczkiw Usqp Cau
Source : pinterest.com
